U S E R M A N U A L
Restaurant Management Software
1. Aa la Carte (KOT Based)
2. Touch POS Billing
Downlod Free 7 Days Evaluation Version Now!!
(How to Downlod & Install this Software)
DETAILED MANUAL
@@ Modules to Learn @@
* Table Master & QR Code
* User Profile Master
* Company / Restaurant Details Master
* Order Entry Dashboard
* KOT Entry
* Online Order through Android App
### Lets Start Software Now ###
~ After we finish Software Installation,
Restaurant Software Icon will display on Computer Screen
(As Shown in Below Image)
~ Double Click on the "Restaurant Software" Icon
(to start software)
~ Restaurant Software
~ Create New Company
~ Fill all the details about your restaurant Name, Address, State Name, Mobile No Etc., which you want to display in your Customer Invoice.
~ Press Apply will show your restaurant name as a company created on dashboard
(As Shown in Below Image)
~ Double Click on Company Name to Start your Software
~ User Login Screen
~ Default User ID is "1"
~ Default Password is "1"
(# You can Create New User & Change Password any time in software from User Master Screen.)
~ Restaurant Software Dashboard ~
~ Left Top is Munu Bar
(To Access every Screen of Software)
~ Right Side is Bull Short Cut Menu Bar to Open frequently used Screen in Restaurant Software quickly
---
@@ MASTER MENU @@
~ 1st Menu List is Master Menu
~ Create New Master Data in Software with help of this Menu
## List of all Master Menu available in Software ##
- Account
- Account Group
- Opening Balance Editor
- Item Group
- Tax Slab (GST & VAT)
- Unit Master
- Recipe Master
- Waiter Master
- Charges Heads
- Tax Settings
- Hall Master
- Sale Type
- Purcahse Type
- Series Master
- Membership Master
- User Master
- Company Info
- Close Company
@- Lets Start with Data Entry Now -@
===
*** ITEM / Menu Master Data Entry ***
~ Menu > Master > Items (ctrl+I)
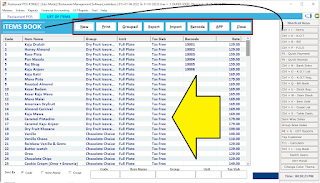
~ Item List will Display
(As Below Screen)
~ Initially Item List will be Blank as its a new Company.
~ Click on "New" Button to start entering the New Item Data Into Software.
~ Press "New" to Start Entering New Recipe/Product Entry
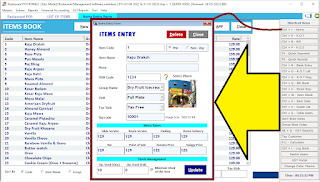
~ Below Screen Gives you look for Item Entry Fields
~ Item Code :: Will display automatically in increasing order starts from "1"
(You can type here Manually the desired Item code, that will be displayed all around the software to generate KOT, Bill, Purcahse Etc. to make to Billing & Ordering Process more faster)
~ Veg - Non Veg ( Radio Button to Select)
~ Item Name : Type Name of Ready Product or or recipe Here
~ None : Alias
~ HSN Code : Type the code available for product or enter SAC code for service
~ Group Name : Create New Here by Pressing F3 Key. Then Select from the List.
(The category created here will be displayed in Touch POS Billing screen. to find the product easily during invoicing.)
~ Unit : Select from List : Full / Half Plate
~ Tax Slab : Select Tax Salb (GST / VAT) from the list available.
(Tax can be calculated above Prices or Inclusive as per setting done in Options)
~ Barcode : You can Scan your Ready products barcode here, that will make billing more fast & reliable.) Putting this Box blank will create a system generated barcode starts from 10001.
~ Image : Double Click on Image & Select the Product / Recipe Image from your Folder Explorer Screen.
~ Menu Rates :::
(While making food bill of customer software will ask first weather customer wants it on table, take away, zometo order or wants to deliver the same in his associated hotel room, according to that selection, the rates of recipe will be applied to bill. we can have seperate rates for all types of food Delivery Invoicing)
Table Service - Rate Applied while we select table aa la carte billing
Room Service - Attached with Booked Room in Hotel associated with restaurnat software. When we Bill for Customer it will ask to select Room No. of the guest to pur bill into Credit. KOT will be printed along with to get signature of Customer. & the same Pending Food Bill will appear while customer Check Out Invoice is Generated.
Seperate Room Service Rate can be give for each recipe / product tobe served in Guest Room directly.
~ Packing - Home Delivery :: Direct Order No Table Booking
~ Bar :: Restaurant associated with BAR & Menu to be served with Liquor, will obviously have different rates the the normal can be types here.
(We have seperate Liquor Store Management Software)
~ Point of Sale :: Kind of Touch POS Billing with Product Name selection in BOX pattern, Recomended if product list is below 50 For Fast Food Billing Counters.
~ Zometo - Swiggy Price :: Seperate rates for Online Food Ordering Apps Billing.
~ Stock Management :: Op. Stock (Qty) Type your Opening stock of Product Ex. Cold Drink Thums Up Bottol How many Numbers you have on satart of Software Billing. Then You can add the same Product stock through regular Purchase Screen.
~ Check Box "Maintain Stock of this Item" :: If Tick Marked then the Product will show into Stock Report.
~ Save :: Save the entered data into items list.
:: Edit - Delete :: To edit or delet the product just double click on the name & edit the required data then press Update Button or press Delete to delete the product.
(Software will allow delete only if product has not been used for any billing previously, if still beed to delete the product then just delete those associated transaction entries of that product.
~ Esc / Close :: Press Close to Exit from the Screen.
====.
:: Create Table ::
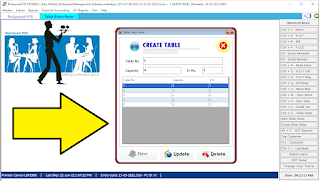
~ Master Menu > Tables
~ Press New
~ Type the Table No.
~ Capacity no person to sit on table
~ Sr. No. for Order to Display (Leave Blank if not any)
~ Save :: Save the Data.
~ Double Click to Edit or delete the Table No.
(Avoid giving Table No. "13" as it considered to be unfortunate No. as per guide of all cheffs & captains)
~ Esc or Red Cross Button to Exit from The Screen.
~~ Waiter Master ~~
Enter the Required Details, Address & Contact Nos of Waiter working in Restaurant.
~ The List will appear while billing Aa La Carte to customer that which waitor is serving. Same will be applied to waiter Ordering App connected with Software.
~ You can Store Photograph also as a record.
~ Seelct Designation of Waiter into Restaurant.
~ Set Waiter Password for Table Ordering App.
~ Save :: to save the Record
~ Double click in List to Edit / Delete data Press Update.
~ Esc / Close :: to exit from the screen.
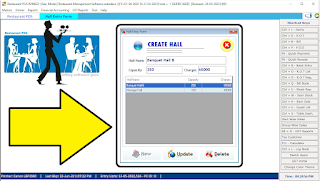
~~ Hall Master ~~
~ Menu > Master > Hall Master
~ Press New to Start
~ Type the Name of Hall (Banquet / Garden Etc.,)
YOu can Also Create with AC or Non AC for the same
~ Capacity of Hall in No. of Persons to acomodate
~ Charges : Type the Hall Rent in Rupees Here
~ Save.
~ Double Click on record to Update or delete the same.
~ Esc / Red Cross Button to Exit from the screen.
====
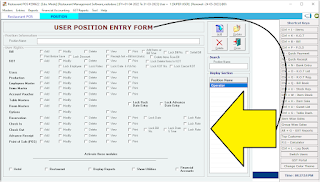
~~ User Rights Profile ~~
~ Menu > Master > User & User Profile
~ Creating New User, Changing Password is Easy with this tool
~ Define the Operator Lever User Specific Software Access User Rights through this Master User Profile Screen.
~~ User Rights Profile ~~
~ Menu > Master > Company Info
~ The Screen allows you to edit any restaurant Address, Phone No Etc., anytime that will give effect in Invoice Print Directly.
~ Even we have Dynamic UPI Payment QR Code
Mapping Bank Details here.
~~ Entries Menu ~~
~ Menu > Entries
Here is the List of all Entries can be managed by this Reataurnat Management Software.
* Table Dashboard
* VAT Bill
* Purchase
* Stock Issue
* Stock Receive
* Stock Journal
* Bank Entry
* Financial Accounting ::
~ Let's Check Now One by One how all these entry screen of restaurant software works in detail.
~~ Entries Menu ~~
~ Menu > Entries > Table Dashboard (ctrl+S)
> All Created Tables in Table Master will be displayed here in Green color.
~ Double Click on any table will open the KOT Screen to enter the Menu ordered from specific table.
~ Right Click on specific table will Convert all KOTs into Bill
~ Below You can Click button to make KOT or Bill Direclty.
~ Even you can Change Guest table No by clicking on "Change Table"
~ Red Color Table suggests that guest are already there and not yet Billed.
~ Once we Make Bill of Red table occupied, It will turn into Green Color Immediately to take order for another guest.
~ if all bills are made & still Table not converted into Green to allow other guest for billing may be user has deleted ongoing KOTs by mistake. in that case, just go to menu > Help > Remove Null > Click on "Free all Kots". This should turn every empty Tables to Green.
~ Refresh the Button on top to get the details updated on dashboard latest
~ Press Exc or Close to Exit from the Screen.
===
~~ K.O.T. ~~
~ Menu > Entries > KOT
~ Kitchen Order Taken
~ KOT is generally used for Aa La Carte Billing System. Where Guest occupy Table, Then Capton / Waitor attends them and take order frm Menu, & hand over the list to Kitchen Chef to prepare the Recipe & then serve.
~ KOT screen can be accessed from Table Dashboard or directly from right Side Shoprtcuts Panel.
~ New : Click on New to Start New KOT
~ Date : Default System date will appear
~ No. : Auto Increment No will Diaplay
~ Waitor Name : Select Name of Waitor whoc takes table order
~ Table No. : Select Table No. from right Panel List of the specific guest
~ Item Name : Select by Item Name Typing or Code Typing.
~ Qty : No of Recipe to serve
~ Price : Rate will automacically pickup as stored into item master. We cal always edit it here.
~ Go on Selecting Other recipes ordered by guest.
~ Save & Print.
~ Running KoTs > Double Click on specific KOT from list to edit.
~ Esc / Close to Exit from the screen.
===
~~ Bill ~~
~ Menu > Entries > Bill (ctrl+B)
~ Guest Bill can be made so many ways.
* Packing, Home Delivery, Zometo, or Table Service.
~ If its table Service it will be converted from the KOTs Generated earlier.
~ If its other than Table Order, we can directly come to this screen & Seelct Items to be billed Save & Print.
~ Lets Understand the screen step by how to enter the data.
~ Bill Screen will give the List of all bills generated today.
~ Click on New to Start New Bill
~ We can Directly come to this screen from Table DashBoard Screen by selecting the table the click on Bill Option.
~ New : Start New Bill
~ Date : Current System Date Will Appear. > Press Enter Key
~ Service Type > Select from the List Available :: Table Service, Room Service, Home Delivery, Zometo, Packing Etc.,
~ Bill No. :: Will display automatically
~ Mobile No. : Customer No.
~ Guest Name : Name of Customer
~ Remarks : if any
~ Discount : to be applied on whole Bill
~ Item Name / Code : Type any character of your recipe Name or its Code here for Billing
~ Qty : Type No. of Menu Item Selected
~ Rate : Price of Menu Item will display from Item Master. You can edit the details here if rights are given to user.
~ Once all list finished entering, Check Footer Screen.
~ Footer screen will display all sub totals summery
~ Press "Plus Green Button" :: Beside Receipt Amount
~ Select the Tender of Customer. i.e. Cash/Card/Wallet
(Default is Cash)
~ Save : Save & Print the Invoice.
~ We can Save & Print the Invoice & Settle it afterwords once customer Sends Payment through Waitor Also.
This can be done from the Bill List Screen. By Clicking on Settlement Button Beside Bill Amount raw.
(This needs settings to be done : Settlement Required from Options in Tools Menu)
>> Tools > Options > Tick Mark on
"Bill Amount = Credit Tender (Automatic)" > Apply.
~ This will allow to settle Bill later on once customer Pays the bill.
~ Edit or Delete Bill by Double Click on Bill list Screen on specific Bill.
(Allowed only if user rights given to modify or delete the Prepared Final Bill)
~ Esc or Close to Exit from the screen.
~~ Bill List Screen~~
~ Menu > Entries > Bill
~ All Billd made during the day will display here.
~ You can change the date from & to period to analyse other dates sales data here
~ Print the list
~ Click on Payment Summary Button Below to print Day wise Tenderwise Total to Cross check payment received during the day to close the accounts cash & other Payment Apps.
~ Footer screen will show totals
~ Settle Button can be used to open the invoice again and change the tender option.
~ Search Button can be used to filter the data required between selected date range.
~ Esc or Close button to exit from the screen.
===
~~ POS (Touch) Billing ~~
~ Item Name Box Touch POS Based Billing Screen Easy & Fast for billing of take away, Packing, Home delivery, zometo Etc.,
# NOt recomended for Aa la carte billing as it generates bill directly & no KOT is generated of order here.
~ All Fast Food Counters can use this crenn for billing, Low Nos of item in Menu list will make easy & Fast Selection here.
Check Live Video Here to see how does this screen works
~ Lets Start How to Use this Screen.......
~ Menu > Entries > POS
~ Categories will be displayed in center area
~ Selected category / group preducts will be displayed on right panel
~ Just click on product you want to bill or touch it if you have Touch POS
~ Selected Items will be listed on Left side Billing Panel
~ Footer area will show you total of the invoice
~ You can add customer Name, Phone No
~ You can select tender type here with Plus Button Click
~ Select customer for Dine In, Packing, Delivery Radio Buttons
~ Search Specific Group or Item from top filter box
~ Save the Invoice with Print or preview
~ Close / Esc to exit from the screen.
~ POS Book is the report to the saved invoice totals and double click on the same to edit or delete.
~ Deleting speficic Item from bill list is just to click small grey button beside the end of Item Line In Billing Screen.
~ You can even Edit rate & Qty by double clicking item
~ If you click item again & again in Touch Selection area, it will increase the Qty of that item succesively.
===
~~ Purchase Bill ~~
~ Menu > Entries > Purchase
~ Purchase entries are generally made for items of trading which needs to maintain stock.
~ Date : Date of Purchase
~ Party : Select Supplier Name from list or create new by pressing Fe Key there.
~ Purchase Type : Select B2B or other from lisr
~ Bill No.
~ Item Name : select Item Name from the List
~ Qty : Type the Qty display in Purchase Invoice
~ Rate : Price of Product given by supplier withour GST
~ Discount : Can be added itemwise if required
~ go on adding items once finishes press save button.
~ Footer area will show Total summary
~ Footer left panel shows extra charges to be added in invoice like freight etc.,
~ Press Red Cross Button or Esc to exit from the screen.
~ Purchase Bill List Report > Double click on specific entry to edit or delete.
~ to delete selected item from bill list just press "delete" Button from keyboard.
===
~~ Recipe Master ~~
~ Menu > Master > Recipe
** This is wonderful feature of this software.
TO watch how this recipe made in software Live You can go through video shown below
~ Click on New to start
~ Type your Recipe Name
~ Select Main to Produce from the List (Which you are making recipe)
~ Type Qty
~ Select "Raw Materials (Ingredients) required to make this item" from item list
~ Type Qty Required
~ Go on adding items from list
~ By Products generated as a result of production
Select from list only if required to maintain stock of by product
~ Save.
~ Recipe Master will show the saved recipe list
~ Double click on it to edit to Delete
~ You can have idea while bulk quantity production required for the same Recipe Item.
~ Press Red Cross or Esc Button to exit from the screen.
~~ Live Video ~~
How Recipe Master can be used.
~~ Production ~~
~ Menu > Entries > Production
~ New : start
~ Date : Default Date is system date
~ Voucher No. : pops up automatically
~ Recipe Name : select from the lsit which you want to enter data of production
~ Main Item to Produce, Finished goods Generated, Raw Material Consumed will be loaded immediately as per master data added as BOM in Recipe Master.
~ Qty : Type the No of Quantity required to product the selected item
~ Press OK will automatically set the Finished goods qty & Raw materials consumed,
~ Press Save
~ Saving this entry will increase Finished goods stock and decrease Raw materials stock immediately. Can be analysed from stock report.
~ Double click from Product list report on same entry can be edited or deleted any time if user rights to modify production is given.
~ Press Red Cross or Esc Button to exit from the screen.
===
~~ Hall Booking ~~
~ Menu > Entries > Hall Booking
~ Special Billing screen in our Restaurant Management software for Hall Booking available
with all booking details...
~ Useful for all Banquet Halls, Open Ground, Party Plots Booking Etc.,
~ New : Start Entry
~ Date : Select date of Booking
~ Voucher No. : Automatic increasing numner will display
~ Party Name : Customer Name details enter by prAessing F3 here or select from the lsit
~ Mobile No. of Customer
~ Function Date : Select from Date Range for Booking of event From & To Dates
~ Program Type : Type Marriage/Birthday Party Etc.,
~ Hall Name : Select from name if you have more than one hall to book for, This list comes from the list created into Hall Master.
~ Guest Count : No of Guest (estimated) ** Important Figure to write
~ Decoration Type : Any requirement to be noted
~ Hall Booking Amount : Pops up automatically which is entered into Hall Master, still you can edit the figure here
~ Additional Decoration : Charges to be applied type here
~ Catering Charges :
~ Total Amount : Sums up all the charges above selected
~ Advance Amount : Select tender type by pressin Green Plus Button
~ Balance Amount : Pops Up Automatically the difference to pay
~ Big Text Box of Extra Details & Remarks 2 given to enter any other details for the Booking order to keep in record.
~ Right Panel shows customer Photo & Previous Ledger & other account details.
~ Save : Save the Booking
~ Booking list double click on entry to edit or delete (only if user rights are given)
~ Close or Esc to Exit from the screen.
===
~~ Quick Payment ~~
~ Menu > Entries > Quick Payment
~ Quick Payment Single Entry Screen
>Menu >Transactions >Quick Payment (F5)
>Quick Access from Right Panel
~ Easy Entry Screen for operators who doesn't have much knowledge about accounting and doesn't know which account to take as credit & Debit.
* Quick Payment Entry Screen will be Used for Two Major Purpose.
1. Supplier Purchase Payments
2. Daily Expenses Made (Cash & Bank)
~ Start the Entry Screen
go on pressing "Enter Key" to make entry
~ Select the Date which you have done Payment on
~ Payment Mode : Select Cash / Bank from drop down list available
Create New Bank here by Pressing "F3" Key (Restart Screen to view effect)
~ Receipt No. : Number will Display automatically here
~ Account Name : Select your Supplier Name or Expense Account
Create New Expense Account here by Pressing "F3" Key, Please make Sure that you select "Direct Expense" as Account Group for any expense account.
~ "Enter Cheque Information"
If you have Selected any Bank as Payment Mode, Software will show Cheque Details Information to feed pop up. Type the Details as below.
~ Cheque No. : Cheque Leaf Number Eg."458265"
If you are paying the amount through any Online Utilities Like : GPay, PhonePe, AmazonPe, PayTm, BHIM or Transferring the Fund Online through NEFT - IMPS - RTGS Etc., then Instead of typing Cheque Number, just type the Payment Mode there as it is. So that when you go to Report you can filter the payment data properly from which app you have paid how much to cross verify. Watch our Live Video for more details on this.
~ Cheque Date : No need to type any date here.
Rather we would suggest that entry date should be same as cheque Date, or Actual Payment Realization date in Bank. That will help you with less Re Conciliation needs of Bank Statements while cross verifying.
~ Bank Name : Not Needed in Payment Case, as we have already selected Bank Name in payment Mode.
~ Total Amount : Amount to Pay
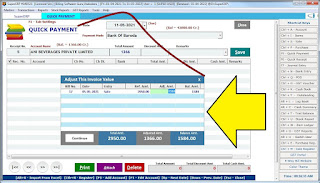
If you are paying any Pending Payment to Supplier for the purchase made, & If you have "Check ON" Supplier Account Master's # "Maintain Bill-by-Bill Balance" with Credit Days for Purchase, then after entering the total amount, SuperERP software will show you pending Purchase Bills Details with Amount to adjust.
Software will automatically take last Invoice first as amount adjustment entered into total amount if for more than one Invoice to pay. You can Still select the Specific invoice Amount to pay against the bill and skip other invoices.
Software will show "Adjusted Amount" & "Balance Amount" for Invoice Reference. Here you can Edit the Adjustment Amount Manually and make part payment of invoice too.. Later ON the same invoice will show details with Pending Amount from same Invoice only. Any Leger or Log Report of Specific Supplier will show all these details.
Payment Receipt Print will also print these Bills Details if required. Check the Preview of Payment Receipt Image given Below
~ Discount Amt. : Discount in Final Payment.
Software will clear the total Pending Invoice Amount & post the Discounted Payment Amount to Discount Leger same time. Total three Leger accounts will be affected a.Bank, b.Supplier, C. Discount.
If we are paying full Invoice amount then keep this as zero Value
~ Remarks : Type any Remark / Narration related to payment. That will Print in Receipt.
===
~~ Reports ~~
~ Menu > Reports
Three Menu for Reports ::
A. MIS Reports,
B. Financial Accounting Reports
C. GST Reports
** List of Main Available Reports **
* User Shift Report
* K.O.T. List
* K. O. T. Register
* POS Book
* Bill Book
* Bill Book - with Items
* VAT Bill Book
* Top Customers
* Business Source Report
* Room Type Report
* Sale Reports > Item Wise & Group wise sales
* Stock Report > Stock Summary, Item wise Stock Movement Reports
* GST Reports will show all GSTR1, 2 & 3B Reports Analysis.
~~ Item wise~~
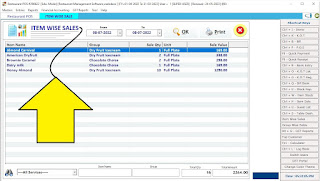
~ Menu > Reports > Itemwise Sales
~ Select the Date Range from & To
~ Press OK to check the Item wise total qty served in restaurnat with sale Value
~ Below image shows report preview
~ Any Report can be exported to excel from print preview White Page.
Press REd Cross or Esc button to exit from the screen.
~ Same way Group wise sales report is available to analyse restaurant business
that which recipies are more admired by customer on specific date range.
~~ Financial Reports ~~
~ Menu > Financial Reports
Start from Daybook, cash book to Trial Balance, outstanding reports to Balance Sheet all reports are available in software. All Expense & salaries made during the financial year can be analysed and prepare balance sheet of the business including Cash & Bank Ledgers.
~ Check Below Image for the list of available reports.
~ All reports can be exported to Excel. from preview Page > Export Button.
~~ Table QR Code ~~
~ Menu > Table QR Code
~ Specific Table QR Code can be made Printed then scanned for billing
~ A very Unique feature.
===
~~ Time Line (Audit Security) ~~
~ Menu > Help > TimeLine Report
~ This is Important User Audit Report.
~ Though software have user rights menu & block for unauthorised transactions still to analyse unwanted activity of invoice editing or deleting with invoice history when saved & edit by whom with time frame can be accessed here.
~ Search button also available for required filer of the data with date range to selct
~ TRACK button on right side of line list can be used to check history of invoice
~ Close or esc to exit from the screen.
~~ Online Orders ~~
~ Menu > Help > Online Order
~ Order Taken from App on table by waitor will be displayed here.
~ You can click on Bill Button beside or setle to Generate invoice from collected orders from app connected with this software.
===
~~ Software Registration ~~
~ Menu > Help > Register License
~ Software Activation Form
~ Type the details Required
~ Use License Code & Partner Code as "k9727" for evaluation purpose
~ Press "Send Activation Request" will start software.
~ Once software you like, & Pay for it, You will get permenant License key
~ Whats app us from more details : 9727955514
~ We Give support through Temviewer or Anydesk Remote Desktop Acccess Softwares.
~ Any Windows Based PC / Laptop Supports this software.
~ Any Thermal or laser / Inktank priners to print reports & receipts are supported.
Download your Free Demo Software Now :

