This Blog will Show you Driver Settings Required to Use Any Barcode Printer as Thermal Receipt Printer as POS Printer. So to Reduce table Space on POS Counter & of course the Budget.
Let's Start : First of all we have to remove the Ribbon to use our Barcode Printer as Thermal Receipt Printer.
(No need of Extra Ribbon as Thermal Roll it self contains chemical layer and Barcode Printer has Inbuilt Thermal Head to Print)
# We do required ribbon in Barcode printing as Barcode on Product requires to stay for Long Period & of Good Accurate quality print so that when it comes to POS Counter for Scan Purpose it servers the purpose well.
Now go to Windows OS Control Panel > Devices & Printers > Find the Barcode Printer Driver.> Install the Copy of Same Barcode Printer Driver Again>Name the Second Printer Driver as "BIll" for Our Reference to map into Software POS Invoice Print Profile.
Now Right Click on the Selected Printer Driver > Go to Printing Preferences :
Now go to Page Setup > Stock Tab > Select "USER" > Now Press Edit >
Now Select "Continuous (Variable Length)"
Now Click "Stock" TAB. :
Select Media Settings : Method : "Direct Thermal"
Select Media Settings : Type : "Continuous"
Press : Apply. OK. Save.
This Settings Should Print your Invoice Like this. Done.
Now for Same Printer : if you want to use it as Barcode Printer :
Just Install Another Driver od Same Printer & Do the Following Settings :
Driver : Right Click : Printing Preferences : User Print Option : Edit :
Select Type as : "Die Cut Labels"
& Size of Barcode as actual in Width & Height.
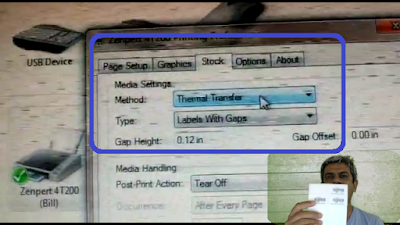
In Stock Option for Barcode Printer Settings Do as Bellow :
Media Settings Method : "Thermal Transfer"
Media Settings Type : "Labels with Gaps"
The Actual Print of Barcode should Look like this. The settings is Done.
Thanks for Reading the Blog.
The Whole Process Above is Shown Live in Below Youtube Video :
Watch for your Reference.
Thanks for Watching.
Visit our Brand Website to Download Demo Software for Free.


